U-Stor-It User Guide
Andy Huang
Department of Computer Science
Table of Contents
1. Introduction
1.1. Abstract................................................................................................... 3
1.2. About This Document............................................................................... 3
1.3. Why U-Stor-It?........................................................................................ 3
1.4. Technical Details....................................................................................... 3
2. Basic Tasks
2.1. Getting Started With a Certificate.............................................................. 4
2.2. Uploading and Managing Your Files.......................................................... 5
2.3. Finding Other Users.................................................................................. 7
2.4. Allowing Other Users to Access Your Files............................................... 8
2.5. Messaging Other Users............................................................................. 9
2.6. Accessing Other Users’ Files.................................................................. 11
3. Advanced Functionality
3.1. Groups................................................................................................... 12
3.2. Browsing and Setting Permissions on Credentials..................................... 13
3.3. Version Control...................................................................................... 14
3.4. Inheritance.............................................................................................. 15
3.5. Bulletin Boards....................................................................................... 16
3.6. Remote Access....................................................................................... 17
3.7. Multiple Email Addresses........................................................................ 18
1 - Introduction
1.1 - Abstract
U-Stor-It is a web-based file storage system built with security in mind. Its intended use is for clients to share files with others using flexible access controls, similar to existing services like Xdrive (http://www.xdrive.com). However, U-Stor-It uses free and readily available software, allowing anyone to start a server of his or her own.
1.2 – About This Document
This document is intended to help ordinary users master the features of U-Stor-It. Familiarity with essential computer operation, such as file access and web browsing, is assumed. Basic tasks, as well as how to accomplish them, are explained to allow users to get started with U-Stor-It. For experienced users, advanced features are also covered in depth.
On-screen elements, such as hyperlinks, are “quoted”. Important terms or names are italicized.
Nonessential but handy tips are in shaded boxes such as this one.
1.3 - Why U-Stor-It?
At its very core, U-Stor-It allows you to share files with anyone else in a configurable manner. Sharing vacation photos among friends and family is an excellent example of this basic use of U-Stor-It. However, because of the extensive permission system, U-Stor-It can also help coordinate information within group projects, for example. Instead of emailing a document to a coworker, you can upload it and give her permission to read it, make changes, and she can re-upload it for your approval. If a document needs ten signatures, U-Stor-It makes it simple to get it to the whole group.
U-Stor-It also simplifies collaborative use for non-technical applications. Suppose that you had a cabin in Tahoe that you regularly allowed relatives to vacation at. One person needs only upload a schedule, for instance, of the cabin for the next year, and to allow his/her brothers and sisters access to the schedule. Anyone can quickly and easily determine who gets the cabin on a given weekend, without bothering to email various people she who may not even know. If one was feeling particularly generous, U-Stor-It even lets users choose to share files among all of a family’s friends with one simple rule. This expressiveness affords users flexibility and convenience over existing systems in very real situations.
1.4 - Technical Details
The U-Stor-It system is comprised of a certificate authority (CA), a web server running Apache Tomcat interfacing through Java Servlets with a MySQL backend. Security and authentication is handled through the use of X.509 certificates, both for the server and client. Clients can request a free personal certificate from the U-Stor-It CA and use it with the web server over and over again from their personal computers, lessening the need for users to remember yet another password. A unique link to a personal certificate is sent to a new user via email. Multiple certificates can be used for a single account, which can come up in the case of multiple computers, for example.
Most modern browsers are supported by U-Stor-It. The developers have tested functionality on Internet Explorer 4.0+, Mozilla 1.0+, and some versions of Netscape 4. To work properly with U-Stor-It, a browser at minimum must support SSL, client certificates, JavaScript, and CSS.
2 – Basic Tasks
2.1 - Getting Started With a Certificate
To get started with U-Stor-It, you’ll need a digital certificate to identify yourself. A certificate holds such information as your name, an organization you are affiliated with, an email address you use, and your location. Obtaining a certificate is free and easy, and you only need to do it once. U-Stor-It has associated with it a server that acts as a Certificate Authority (CA) that distributes certificates to anyone who asks for one. The U-Stor-It CA can be accessed at:
When accessing the U-Stor-It CA, you may see a dialog box that asks whether you want to trust the site. The reason this dialog appears is that the U-Stor-It CA is operated independently, so the certificate that the CA possesses is not signed by a root CA typically trusted by most browsers. This is not a security hazard; rather, it simply means that we have not paid for a certificate from a company, such as Verisign, that most browsers trust by default.
In order to avoid seeing the aforementioned dialog box from now on, download the
Fill out the form linked in Step 2 on the page. The only required fields are first and last name, and email address. However, you may want to consider filling out other fields as well, since the more information is associated with you, the easier it will be for others you are working with to search for you. You must be able to read email at the address you supply, as a unique link will be sent to you at that address. The link will point you to your new digital certificate.
Most of the information you supply at this point on this form is permanently tied to the certificate issued—if you decide to change your name later, you’ll need another certificate and thus another account. Your email address, however, can be changed (See 3.7).
Some notes regarding the various optional fields: if you do not have or do not want a university or company affiliated with this account, use whatever you like, or nothing, for that field. The Usage field is simply a unique identifier for this particular certificate. Some users may find that they need two certificates—for instance, one for a work computer and one for a home computer. That information is intended to go here, because the U-Stor-It CA will refuse to give out two certificates with exactly identical fields for security purposes. The date of expiration of the certificate can be customized if desired: a longer period of validity for convenience, or a shorter one for security. When a certificate is lost or expired, you will need to get another one, but you will still be able to access the same account.

A confirmation page should appear after submitting the form. At this point, you have to check the email at the address you supplied for the unique link to your new certificate. After clicking the link or copying the URL to your browser, you should get a page indicating that the download was successful. You’re now ready to start using U-Stor-It.
An important security note: only download your certificate to a computer that you trust, and that you can secure. Do not download certificates to publicly available computers, as anyone who has physical or electronic access to the machine can access your U-Stor-It files as well. For public or friends’ machines, set up and use password authentication (See 3.6).
2.2 - Uploading and Managing Your Files
To access U-Stor-It, find and click the first link on the U-Stor-It CA webpage (“If you already have a certificate…”). You can bookmark the resulting page for your convenience. However, before you’re allowed into U-Stor-It, you need to let your browser know which of the digital certificates it currently contains to use. If you requested only one certificate and nobody else is using your computer, you should only see one possible choice.
Files on U-Stor-It are organized in lockers (if you happen to be familiar with file systems on most computers, these lockers work much like directories or folders). Lockers can contain any number of files and sub-lockers (each holding more files and lockers) within, but only up to a predetermined size that you dictate.
To create your home locker, click the aptly named link “Create home locker”. The resulting webpage will be the central interface to upload and manage your files. To the upper left, you’ll find what will later be a tree diagram of your sub-lockers. To the upper right are locker or file operations based on the currently selected locker or file. A locker’s contents or a file’s information is displayed in the middle, and at the bottom you can create new lockers or upload new files.
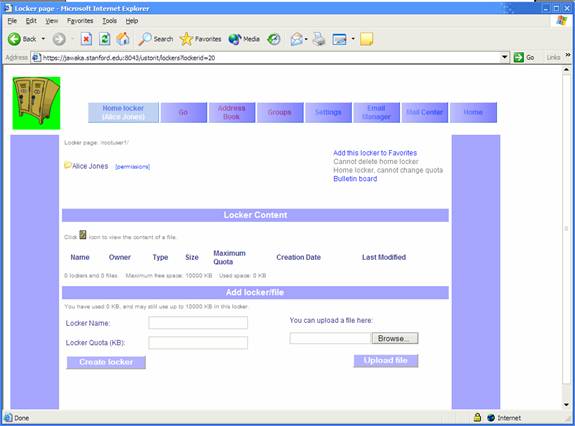
To upload a file, click “Browse…”, select a file on your computer, and click “Upload file”. To create a sub-locker, select a name and give it an initial size limit. Most users will be given 10,000KB (10MB) of space in their home lockers, so make the initial size for the new sub-locker anything up to 10MB.
This is an initial size limit, so if you need to make more or less space for it later, you can do so by clicking the link for the locker, clicking “Change current locker quota”, and entering a positive or negative value (in KB) indicating the amount of change you’d like to apply.
To view the contents of a locker or the settings associated with a file or locker, click on its name in the “Locker Content” area of the page. For files, you will be taken to a page for the settings of that particular file. To view or download a file, click the file icon in the locker listing, or click on the name in the file settings page.
To delete a file or locker, select it and click “delete current” from the upper right contextual links. Lockers cannot be deleted until they are empty.
2.3 - Finding Other Users
You can search for users and then add them to your address book to more easily refer to them at a later time.
There are a number of different ways to find other users: by name, by email domain (like msn.com or aol.com), by university/company, or by location.
You can only specify one criterion to search by at a time. Be sure to use the radio button to the left of your search criterion to select it before submitting. All fields but the name are dropdown boxes for convenience. The name field requires a last name at least, but can also do substring searches if you’re not sure about spelling.
A list of possibilities is returned where you can select one, making that person affiliated with the name you chose. Now you can browse this user’s credentials (See 3.2) or set permissions for this definition (See 3.2).
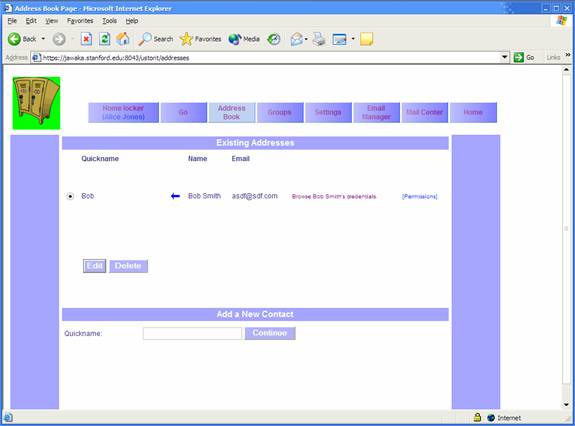
The simplest way to refer to other users on the system is to add them to your address book. Select the address book tab, and pick a new name for the person you want to find. After you find this person, the name you pick will be the easiest way for you to refer to him/her.
To refer to a number of other users in a group, use groups (See 3.1).
2.4 - Allowing Other Users to Access Your Files
Now that you can refer to other users by nicknames you assign, you can easily let them view or modify your files. The permission system of U-Stor-It is modeled after a typical UNIX file system, where, for each file, there is a list of users that specifies who can do what to that file.
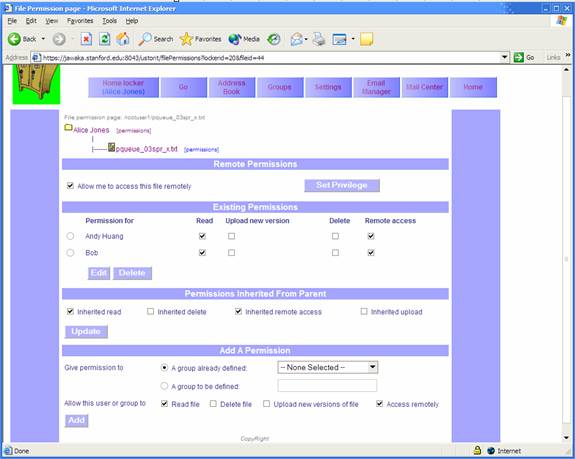
Select a file and click the filename to go to the file settings page. Notice that the tree display at the upper left has a “[permissions]” link for the file you selected. Click that to go to the file permissions page. For now, you can ignore all but the bottom portion, “Add a permission”. If you have already defined some quicknames for people in the address book, you can use those quicknames to refer to those people in the dropdown box for “Give permission to->a group already defined”. For a given quickname, you must specify what rights that user has to this file. “Read file” allows you to view or download the file, “delete file” allows deletion (!), and “upload new version” and “access remotely” permissions are discussed in Sections 3.3 and 3.6, respectively.
You can also give permissions to a group or quickname that you haven’t yet defined, if you find it convenient. Simply enter the intended name in “A group to be defined”, and, if you later define that group or quickname, the user(s) indicated will automatically be given the permissions you define now.
The permissions for a user or group on a file can be changed at any time, or permission can be entirely deleted to completely revoke access for that user/group to that file. To edit permissions, select the user or group via radio button on the file permissions page, change the permissions via the checkboxes associated with that user/group, and click on the Edit button. Permissions for lockers involve inheritance, which is covered in Section 3.4.
You can have any number of user and group permissions specified for each file. For example, if you work on a group project with three other people and wanted to give them access to a document, you could create quicknames for those three people and add permissions to that file for each of them. To streamline permissions for multiple people who have the same privileges, use groups (See 3.1).
2.5 - Messaging Other Users
Communication within U-Stor-It is critical in order to work effectively with others. U-Stor-It allows you to contact other users using an email-style messaging system, and you can post comments in per-file bulletin boards (See 3.5).
You may want to contact other people using the mail system if, for example, you need to alert them of a new file you uploaded. Or, perhaps you want to request or give notification of a new shared resource. The mail system is best suited for these types of simple, general messages.
To use the mail system, select the “
To compose a new message, you must have already defined a destination user or group with the “Address Book” (See 2.3) or “Groups” (See 3.1). In the “Send To” field of the “Compose” page, select the user(s) and/or group(s) you’d like to send the message to.
To select more than one user/group, hold CTRL while clicking each user/group you’d like to include.
To keep a copy of this message in your “Sent” messages folder, check “Copy this message to sent message folder” near the bottom. When done, click “Send Message”.

As a recipient, you will be notified of any new messages
upon login with an icon and text (“You have new mail.”) on the “Home”
page. You will also receive an email
notification. To read a message, click “
Note: If you receive a message sent to multiple recipients, no other recipients will be listed with the message.
To delete a message, click the “Delete Message” button when
viewing it.
2.6 - Accessing Other Users’ Files
Navigation to any locker besides your own is handled on the “Go” page linked from the top toolbar. Here, you’ll be able to visit lockers or files you’ve already bookmarked, or you can create new bookmarks.
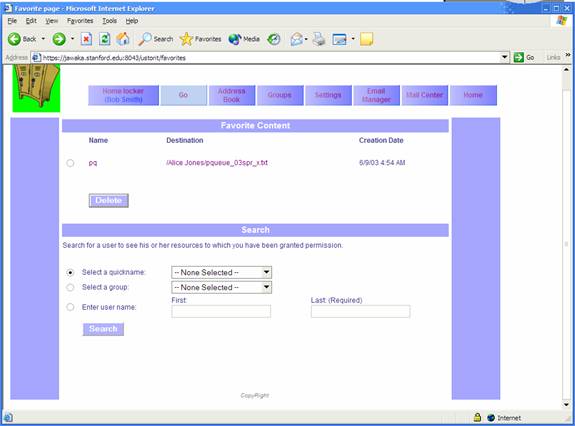
To begin browsing other users’ files, you need to first find a user, and then determine which of that user’s resources you have access to. To find a user, you can use a quickname or group you’ve already defined (See 2.3 and 3.1), or you can search by last and first (optional) name.
Be sure to change the radio button next to the search method you’ve selected.
After searching, you will either be told that that user hasn’t given you any permissions, or a list of possible resources will appear. Select a file or locker from list, and click “Go”. You will be taken to the locker contents or file properties page as appropriate.
Note that these pages will look much like they do for your home locker and files, but you will not have the ability to change permissions or other administrative abilities.
Now you can view files and browse lockers as long as you have the proper privileges. If you are allowed New Version, Create, or Delete privileges, you will also be able to do those actions as well.
If you find that there is a resource in another user’s locker that you would like easier access to, simply “Add this file to Favorites” with the link at the upper right for each file or locker. After choosing a name for the favorite, you will now be able to access that resource by going to the “Favorite Content” section of the “Go” page and clicking on the desired “Destination”. To change the name of a favorite, click on the name you assigned. To delete a favorite, select a radio button next to the desired favorite, and click “Delete”.
3- Advanced Functionality
3.1 - Groups
Instead of giving privileges to a number of users you have defined as quicknames, you may find it easier to group them together and refer to the users collectively, simplifying permission management.
Groups in U-Stor-It can be comprised of any number of users and even other groups you have defined. In fact, a group can also contain a set of other users’ groups of a specified name. For instance, suppose Alice and Bob work in the East division’s testing group, while Carol and David work in the West division’s testing group. A manager, Edna, can create site, a cross-site testing group definition, in a number of ways:
- She can include Alice, Bob, Carol, and David individually in site
- She can create an East testing group and put Alice and Bob into it. Additionally, she can create a West testing group and put Carol and David into that. Then she can add the East testing and West testing groups to site
- Suppose further that Edna has a group lead at each site: Fred at East, and George at West. Edna is so busy that she doesn’t even know who exactly is in each of the East and West testing groups. Suppose that both Fred and George have defined groups called testing containing the members of the testing groups at East and West, respectively.
- Edna can add Fred’s testing group and George’s testing group to site
- Edna can create a group of leads called leads containing just Fred and George. Then she can add leads’ testing to site. What this means is that for each member of leads, U-Stor-It will look up that member’s definition of testing and include everyone in testing.
All of these methods result in the same set of Alice, Bob, Carol, and David added to site, but with differing levels of indirection. Depending on your situation, you may use any of the examples above to model your groups after. Larger groups with more levels will tend to require more levels of indirection in establishing groups.
The group’s group concept can be extended infinitely. However, permissions must be granted for a user to access the definition of another user’s group (See 3.2). If you do not have access to another user’s definition, those members will effectively not be included.
Group membership is resolved only when needed, so you can define a testing group for all of your leads, while some in the leads group may not yet have a testing group defined. When someone in leads defines a testing group or changes the membership of his/her testing group, your permissions will automatically work for those new members.
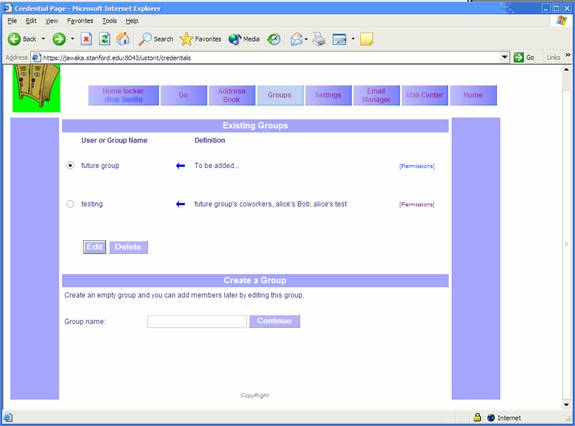
To add members to groups, ‘Edit’ a group and add members at the bottom of the page. They can either be local definitions (groups or quicknames you have defined), or another user/group’s group.
Multiple selections are allowed.
Be sure to move the radio button to correspond to your desired group
type to add.
3.2 - Browsing and Setting Permissions on Credentials
To allow other users to read your definition of a group or a quickname, click the “[permissions]” link next to that group or quickname in “Address Book” or “Groups”. Add read permission for a quickname or a group just as you would add permissions to a file (See 2.4).
To browse another user’s definitions of quicknames and groups, go to “Address Book” and click “Browse foo’s credentials”. If the user you defined as foo has allowed you to view any of her quicknames or groups, their definitions will appear. If you are not allowed access to any of foo’s definitions, you will not see any definitions.
3.3 - Version Control
For many collaborative situations, it is useful to have many people able to overwrite an old version of a file with an updated one. However, at the same time, it is often best to have access to the old copies, in case something goes wrong. Enter version control.
Version control will automatically save old copies of a file when you upload a new version. To upload a new version, go to the properties page for that file, and upload at the bottom of the page just as you would for a new file.
To view or delete old versions of a file, go to the properties page for that file and click “View old versions of this file” in the upper right. Select a version and either “View” to view or “Delete” to delete this old version.

Old versions are, by default, kept for the lifetime of the file. If the file itself is deleted, the old versions cannot be recovered. However, old versions can themselves be deleted without affecting the newest version.
“Upload New Version” is a privilege for your files that you can delegate to other users. To upload a new version of a file in another user’s locker, you must have permission. Otherwise it works exactly as uploading a new version of files in your own locker.
3.4 - Inheritance
Inheritance is a useful file systems concept that allows lockers to automatically dictate the permissions of the files and lockers within, and the files and lockers within those sub-lockers and so on. Using inheritance, you can give read permission to a user on a locker, and the user will be able to read all files and files within sub-lockers within. This convenience, however, can be misused easily, so you should use caution.
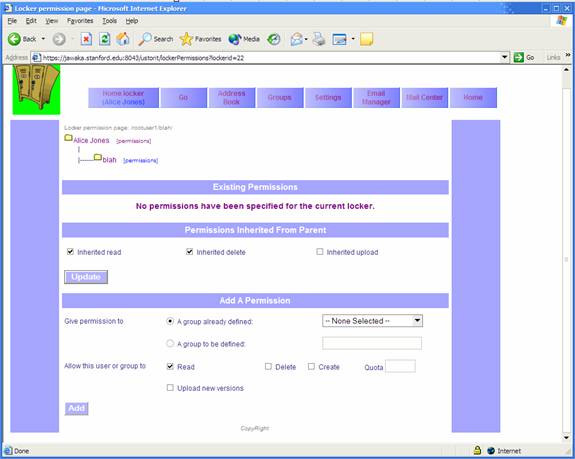
To mark a locker with Read/Delete/Create/Upload Version privilege, click “[permissions]” next to the locker name in the tree display and add permissions just as you would to files (See 2.4). Now, all files within will have, by default, those same permissions for those users. When delegating “Create” privileges, you must also specify a quota representing the maximum amount of disk space that the user can consume.
To help keep inheritance in check, you may want to limit
which permissions get inherited for a given file. If, for example,
To exclude a file or locker from inheritance, edit the permissions for the resource, unchecking items in “Permissions inherited from Parent” as desired, and click “Update”.
3.5 - Bulletin boards
Bulletin boards in U-Stor-It serve the purpose of a discussion forum for particular files or lockers. Each file and locker gets its own bulletin board, which begins empty. To access a file or locker’s bulletin board, click “Bulletin board” in the upper right on a file settings or locker contents page. Messages previously posted by users will appear in chronological order. To post a message as a new topic, click “I wanna say something…” and fill out the subject and message fields. To reply to an already existing topic, click “Reply” next to the desired topic.

You can only post on bulletin boards for files or lockers for which you have Read permission.
3.6 - Remote Access
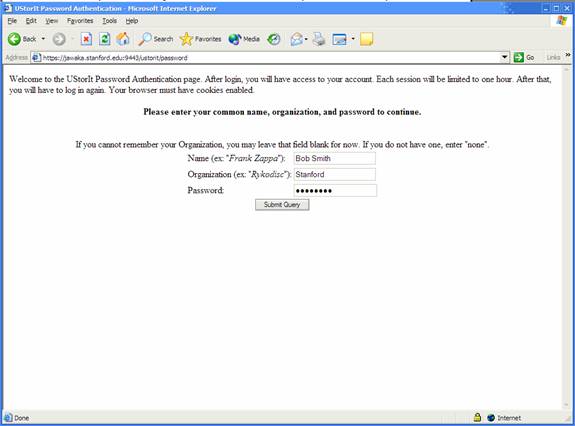
The security of U-Stor-It is primarily based on digital certificates, as we have discussed. However, there are situations in which using a certificate is impossible or unadvisable. Users with old versions of browsers or browsers that simply don’t support certificates are out in the cold. In addition, certificates should only be put on trusted, secure computers—what about public machines at the library or the internet café? In these situations it is best to forgo certificates entirely and stick with a form of authentication that most people are already familiar with: username and password.
One of the advantages of certificates is that users are not tied to a particular username, which can be abstract (therefore hard to look up) and even inappropriate. For a collaboration-based system such as U-Stor-It, being able to look up others easily is paramount to its usability in real situations. Hence, U-Stor-It does not actually use the typical username and password scheme. Rather, the full name, university/company, and a password previously assigned form the basis for unique authentication.
Before you are able to log in to U-Stor-It without a certificate, you must indicate that you allow yourself to log in remotely (without a certificate) and assign yourself a password. These steps are to ensure that a user who never intends to use U-Stor-It without a certificate can still have his/her account remain secure. To change these settings, log into U-Stor-It with a certificate (you must be at a home or office computer) and go to the “Settings” page. If you never intend to log in remotely, uncheck that box and “Submit”. Otherwise, pick a new password of 6 or more characters, type it in twice for confirmation, and “Submit”.
Once set up, to log into U-Stor-It without a certificate, go to:
https://jawaka.stanford.edu:9443/ustorit/index.html
Click on the last link, and then fill out the fields.
If you don’t remember the university/company you used to sign up for the account, leave it blank and U-Stor-It will look up your choices for you.
Once logged in, you will have one hour before your session expires automatically. To log out before that hour is up, click “Log Out” at the upper right.
To ensure security, close the browser window so that the pages you just viewed are cleared from the cache.
As an additional security restriction, some features of U-Stor-It are not accessible when logging in this way. You will not be able to change your password, for instance, until you log in again using a certificate. Also, only files for which you have
“Remote Access” privileges will be accessible from other users’ lockers.
3.7 - Multiple Email addresses
One problem the designers of U-Stor-It tried to avoid is the reliance upon a single email address. If you change ISPs or otherwise need to change your email address, U-Stor-It can be set to migrate your account to that new email address. As an added benefit, you can also affiliate multiple email address with a single account, so certificates generated with those email addresses will still link to your original U-Stor-It account.
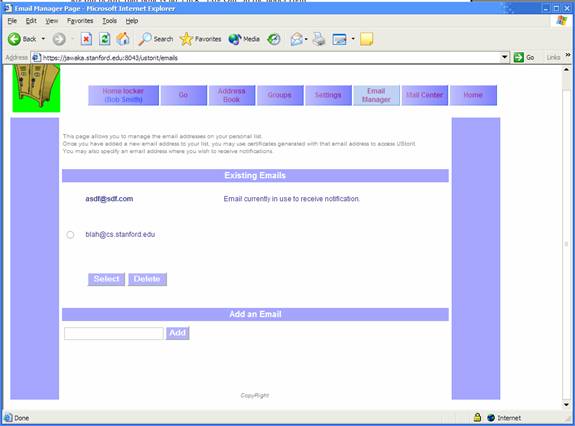
To affiliate additional email addresses with your account, go to the “Email Manager” tab and add a new email at the bottom. A list of email addresses appears in the middle, where you can select one as the primary email address where message notifications will be sent. You can also delete affiliated email addresses by selecting one and clicking “Delete”.
You can add any email address you like, except for any belonging to users already using U-Stor-It.